
SERESGENUS EPHEMERALITY Gear Crafting: Armor and Gear in the Crafting Table Menu, and How the Crafting Route Works
Craftable non-weapon gear in SERESGENUS: EPHEMERALITY includes Copper Chestplate, Copper Helm, Copper Leggings, Graben Greaves and the Leaf Pouch, plus the demonstrated gathering-and-crafting route from HAND CRAFTING through Crafting Table III.
Quick answer
Non-weapon gear in SERESGENUS: EPHEMERALITY is crafted at the Crafting Table, whose menu lists craftable gear including the Copper Chestplate (12 DEF), Copper Helm (15 DEF), Copper Leggings (7 DEF), Graben Greaves (16 DEF) and the Leaf Pouch (20 SLOTS), all made from resources you gather out in the worlds.
- Gear entries live on the Crafting Table menu; HAND CRAFTING, the menu you start with, is where the demonstrated run made early tools, Rope and placeables like the table itself.
- Upgrading Crafting Table I to II costs 50 Wood, 20 Stone, 10 Steel Ingot and 5 Rope, and the table upgrades in place.
- An Ender Chest crafted at Crafting Table III sends stacks of loot ahead to your next run.
Craftable armor and gear in the crafting menu
The Crafting Table I panel lists craftable gear right alongside its material and tool entries. The non-weapon pieces it shows are:
| Gear piece | Stat shown in the menu |
|---|---|
| Copper Chestplate | 12 DEF |
| Copper Helm | 15 DEF |
| Copper Leggings | 7 DEF |
| Graben Greaves | 16 DEF |
| Leaf Pouch | 20 SLOTS |
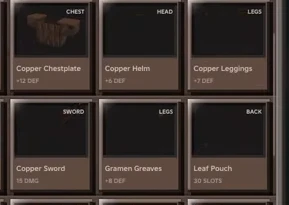
Armor pieces carry a DEF value, and Graben Greaves tops the shown list at 16. The Leaf Pouch is the odd one out — its entry is measured in SLOTS rather than defense. This is the Table I panel snapshot rather than the game's complete gear list: upgrading the Crafting Table exposes additional entries, including armor such as Graben Greaves and the Steel tool and weapon lines.
One honest limit: these entries and their stat lines come from the crafting panel itself, and the reviewed footage does not establish complete recipes for each item, so the exact material list for each individual gear piece is not broken down in this guide. The costs confirmed down to the exact material are the table upgrade and the Ender Chest recipe, both covered below.
The loop behind every piece of gear: gather first, craft second
Gear crafting sits in the middle of the game's core loop. You enter the first world and gather resources from its enemies and terrain; those resources are then spent to craft weapons and gear and to build your base — the place where treasures are stored and where you prepare for your next expedition. Crafting happens between expeditions and during them, across the run's six worlds, and the payoff is spelled out by the game itself: collecting and crafting better equipment makes you stronger for the tougher enemies and bosses waiting in later worlds.
The gathering half is refreshingly literal. In one demonstrated run, the opening minutes needed no tools: punching trees and bushes collected wood, plant fiber and seeds, and HAND CRAFTING then made Rope, and a Stone Pickaxe followed shortly after. Combat feeds the same pipeline — taking down a stone-like enemy early in that run produced pickups like meat on top of experience.
Across a full run, the materials that pass through gathering and crafting reach well beyond the basics: Wood, Stone, Steel Ingot, Rope, plant fiber, seeds, meat, Voidstone Ingot, Abyss Horn, Beast Bone, Beast Hide, Darkroot Wood, Elderwood, Elemental Residue and Khaen Form. The first crafts shown were Rope, a Stone Pickaxe and the Crafting Table itself, while late-run materials such as Voidstone Ingot and Abyss Horn feed the top-tier recipes, the Ender Chest included.
For the gathering side in more depth, see the how to gather materials guide and the resources guide.
Using the crafting menus, from HAND CRAFTING to Crafting Table III
HAND CRAFTING is the menu you have before any Crafting Table exists. It is where the demonstrated run crafted Rope, then a Stone Pickaxe, and later the Crafting Table and Campfire that were placed on the ground — all of them tools and placeables. The armor and pouch entries confirmed so far live on the Crafting Table's own panel.
That makes crafting the table the first real step toward gear. Place it on the ground near your base portal — the home base sits beside the portal that unlocks each world, which keeps the table, storage and travel point together in one spot.
The Crafting Table I panel then shows the gear list above plus its own upgrade line: 'Upgrade to II: 50 Wood, 20 Stone, 10 Steel Ingot, 5 Rope', with an UPGRADE X1 button. Paying that cost upgrades the table in place — no rebuilding or replacing — and each higher tier exposes additional entries on the menu. The same run demonstrated here went on to reach Crafting Table III, the tier where the Ender Chest becomes craftable.
A working route to your first pieces of gear
Checklist
- Punch trees and bushes
Collect wood, plant fiber and seeds by hand. This works from the opening minutes of a run, before any tools exist.
- Craft Rope and a Stone Pickaxe in HAND CRAFTING
HAND CRAFTING is available before any table exists, and these are its demonstrated early crafts.
- Craft a Crafting Table and place it near the base portal
The table is crafted in HAND CRAFTING and placed on the ground, keeping it beside the portal that unlocks each world.
- Open the Crafting Table I panel and pick your first gear
The gear entries — Copper Chestplate, Copper Helm, Copper Leggings, Graben Greaves and Leaf Pouch — are listed alongside materials and tools.
- Upgrade to Crafting Table II
50 Wood, 20 Stone, 10 Steel Ingot and 5 Rope through the UPGRADE X1 button. The table upgrades in place, so there is nothing to rebuild.
- Reach Crafting Table III for the Ender Chest
The III tier is where the Ender Chest is crafted from Voidstone Ingot and Abyss Horn, letting loot carry over between runs.
Keep your gear between runs: the Ender Chest
Gear crafting in a run-based game raises an obvious question: what happens to your equipment when the run ends? The Ender Chest is the answer. It is crafted at Crafting Table III using Voidstone Ingot and Abyss Horn, and its on-screen description explains the whole system: 'Click a stack to send it to your Ender Chest for a later run; click again to take it back. Craft an Ender Chest in a run to open it.'
The same behavior appears where it matters most. When a run finishes, the completion screen offers a STORE IN YOUR ENDER CHEST panel with the identical click-to-send, click-to-take-back controls — so loot earned in the final stretch of one expedition can be sitting in storage when the next one begins. Just remember the chest's own rule: you need to craft an Ender Chest in a run to open it.
Stored loot pairs naturally with what a run pays out — the run rewards page covers those payouts, and the base storage guide covers keeping things at home during a run.
Where gear crafting fits in the bigger picture
Gear is one half of the crafting output; weapons have their own line on the weapon crafting page, and the longer path from your first Copper pieces to better equipment is traced in the gear progression guide. Since the point of better equipment is handling the tougher enemies and bosses of later worlds, the how to win a run and bosses guide pages are natural next reads — and if you are earlier in the game than your first Crafting Table, the beginner guide and the crafting guide cover the run from the very start.
Related Guides
Weapon Crafting: Workbench First
Which workbench and resources you need first, and what stronger weapons demand before you can craft them.
Gear Progression: Weapons and Armor
How to upgrade from starter gear to better weapons and armor as runs get harder.
Crafting Guide: Tools, Weapons and Gear
Where to access crafting and how to craft tools, weapons and gear for your runs.
How to Gather Materials
Where to gather each material efficiently and which tools make gathering faster.