
SERESGENUS EPHEMERALITY Weapon Crafting: Workbench and Resources You Need First
How to craft weapons in SERESGENUS: EPHEMERALITY — start in Hand Crafting, place and upgrade a Crafting Table, and gather the resources each tier needs.
Quick answer
Weapon crafting in SERESGENUS: EPHEMERALITY happens at a Crafting Table, using resources you gathered in the worlds — and you need no workbench for your first items, because the HAND CRAFTING menu already covers basics like Rope and a Stone Pickaxe. Craft the Crafting Table in that same menu, place it at your base, and its panel becomes your weapon and tool workbench.
- No workbench needed to start: HAND CRAFTING makes Rope and a Stone Pickaxe before any table exists.
- First real workbench: a Crafting Table, crafted in Hand Crafting and placed on the ground — beside your base portal is the convenient spot.
- Resources to chase first: wood, plant fiber and seeds from trees and bushes, plus stone, with steel from ore rocks waiting for the higher tiers.
- Known upgrade price: Crafting Table I to II costs 50 Wood, 20 Stone, 10 Steel Ingot and 5 Rope via the UPGRADE X1 button.
Weapon crafting sits at the center of the loop SERESGENUS: EPHEMERALITY is built around: you gather resources from the worlds you explore, and you craft weapons and gear from them between expeditions. Each run ends with you turning fresh loot into the equipment your next run relies on, which makes your base the workshop and the Crafting Table its centerpiece.
The workbench question: start with nothing, then place a Crafting Table
The first crafts of a run need no station at all. Open the HAND CRAFTING menu and you can already make Rope and then a Stone Pickaxe — both were crafted this way at the very start of a solo run, with no table placed. Hand Crafting is also where the workbench itself comes from: the menu offers a Crafting Table and a Campfire, which you craft and then place on the ground. Once the table is down, table-based crafting opens up, and that panel is where the weapon and tool entries live.
Where you put the table is about comfort rather than function. The natural spot is beside your base portal, next to your chests — a base area with the portal, a crafting table and storage keeps gathering, crafting and banking in one place.
Checklist
- Punch trees and bushes
Wood, plant fiber and seeds come straight off trees and bushes, with no tools required for this first pass.
- Open HAND CRAFTING
Craft Rope, then a Stone Pickaxe. This menu needs no placed station, so it works from the first minute of a run.
- Craft and place a Crafting Table
Also made in Hand Crafting. Place it at your base — beside the portal and your chests is the convenient spot.
- Craft your weapons and tools at the table
The table panel lists entries such as Copper Sword (15 DMG), Copper Axe (POWER 2) and Steel Pickaxe (POWER 3).
- Upgrade the table when you can afford it
The I to II upgrade costs 50 Wood, 20 Stone, 10 Steel Ingot and 5 Rope through the UPGRADE X1 button.
What the Crafting Table menu lists
The table panel reads as a straightforward list of entries, each with a stat label shown next to it:
| Entry | Label shown on the panel |
|---|---|
| Copper Axe | POWER 2 |
| Copper Pickaxe | POWER 2 |
| Copper Sword | 15 DMG |
| Steel Axe | POWER 3 |
| Steel Pickaxe | POWER 3 |
| Steel Shovel | DIGS 2x2 |
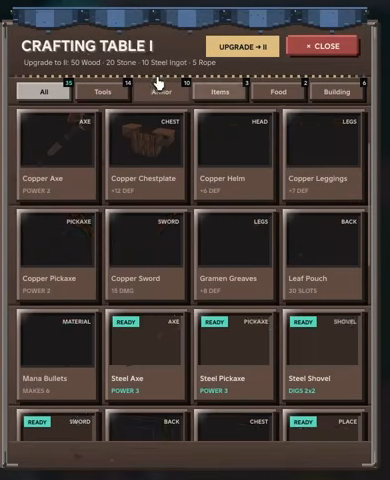
The Copper Sword is the clearest weapon entry at 15 DMG, while the axes and pickaxe carry POWER ratings and the shovel a DIGS rating. Two things matter about this list. First, it shows what the menu contains — an entry being listed does not by itself mean your current table tier can craft it, and the panel does not spell out each entry's ingredient costs alongside the labels. Second, the Steel entries are the higher-tier side of the menu: upgrading the table is what exposes additional tools and weapons such as the Steel tools, and once the table had climbed a tier in one run, a Steel Pickaxe was crafted from it. Your early gathering should therefore target wood, stone and steel — the table's own first upgrade demands them, and the menu's higher entries sit behind those same tiers.
Upgrading the table: from I to II to III
The Crafting Table upgrades in place, so you never rebuild it. The first step has a known price: Crafting Table I to II costs 50 Wood, 20 Stone, 10 Steel Ingot and 5 Rope, shown as an upgrade line with an UPGRADE X1 button on the panel. The path continues from there to CRAFTING TABLE III.
Each tier widens what the menu can produce. Higher tiers expose additional tools and weapons, the Steel tools among them, and the top of the path reaches recipes built from late-run materials: at Crafting Table III, an Ender Chest was crafted from Voidstone Ingot and Abyss Horn — a neat picture of how far the same single table travels from its wood-and-stone beginnings.
The resources to gather first
Everything the table consumes comes from the worlds themselves, and each world carries its own resources. Start with the basics: punch trees and bushes for wood, plant fiber and seeds — the same gathering that fed your first Hand Crafting recipes. Stone belongs in every early shopping list too; the table's first upgrade alone asks for 50 Wood and 20 Stone. Steel is the first resource you genuinely have to hunt: it comes from ore nodes, and in one run the player searched out the steel-bearing rocks by their rusty appearance while looking for steel.
A good rule of thumb: gather resources in each world before crafting new weapons and gear. Since crafting happens between expeditions, every world you clear doubles as a supply trip for your next round of equipment. The how to gather materials and resources guide pages break the gathering side down further.
Materials you will meet along the way
Across gathering and crafting menus, the material names you will run into include Wood, Stone, Rope, plant fiber, seeds and meat in the early game, with Steel Ingot, Voidstone Ingot, Abyss Horn, Beast Bone, Beast Hide, Darkroot Wood, Elderwood, Elemental Residue and Khaen Form appearing as a run goes deeper. The higher tiers draw on that later group — Voidstone Ingot and Abyss Horn both fed the Crafting Table III Ender Chest recipe — so treat these names as the labels to watch for in your inventory as you push through the worlds.
How crafting fits the run loop
Weapons are crafted between expeditions, so the rhythm is: run a world, haul its resources home, craft at the table, upgrade what you can afford, and head back out stronger. Storage is part of that rhythm — chests at your base keep materials and gear ready between runs, and the how to build a base guide covers setting that space up. When you want to look beyond weapons, the gear crafting and gear progression pages map the equipment side, and the main crafting guide ties the whole system together.
Related Guides
Crafting Guide: Tools, Weapons and Gear
Where to access crafting and how to craft tools, weapons and gear for your runs.
Gear Crafting: Armor and Gear
How armor and gear work in the crafting table menu and how the crafting route flows.
How to Gather Materials
Where to gather each material efficiently and which tools make gathering faster.
Gear Progression: Weapons and Armor
How to upgrade from starter gear to better weapons and armor as runs get harder.